• ******* To read about the changes to the marketplace click here

155 Bowfront Hood build 101

Aquaman_68

too many gadgets to fail
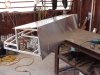
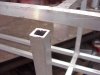
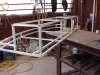
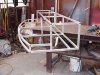
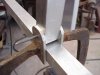
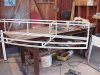
Ok...I've had these pics laying around for a very long time.... So this will be an installment of the start to finish of this project...I have many pics & want to explain this in detail so keep posted.....This is a start to finish custom build of my hood for my bowfront...The construction of the hood is all aluminum....The frame consists of 3/4 square aluminum tubing as pictured below...
 

Attachments

  • MVC-003S.JPG
    MVC-003S.JPG
    24.7 KB · Views: 1,067
Last edited:
I had to make a template of the radius of the tank so I could know how far to roll the sqaure tubing for the front pieces...
For this I just placed a piece of cardboard longer than the size of the tank & placed the tank on it & marked the radius. After I had a template of the tank radius, I went to my local metal fabricating shop & used their roller to roll the radius in the front sections I precut....(I made them a foot longer so I could trim them with the correct angle once they were rolled to the correct radius.)
All other epices were cut to exact sizes that were drawn up in my plans except the two front peices for the radius. Most cuts were done with a compound miter saw with a stone blade....(you can also use a sawzal with a steady hand & get accurate cuts FWIW) heres a pic of a raw section after it was rolled.
 

Attachments

  • MVC-040S.JPG
    MVC-040S.JPG
    31.2 KB · Views: 1,037
Last edited:
Close face down shot
 

Attachments

  • MVC-041S.JPG
    MVC-041S.JPG
    32.6 KB · Views: 1,037
Heres a pic of the frame with all peices tig welded together... Notice the low front section...The other section will swing from the top of the frame with a stainless steel marine grade piano hinge.
 

Attachments

  • MVC-002S.JPG
    MVC-002S.JPG
    45.6 KB · Views: 1,054
Last edited:
another angle...On this pic notice the small section of vertical stock towards the middle of the frame work.. There will be two sections fitted to the frame offset from the ends to support the weight in the middle once the top is secured. These sections can be lowered & lifted upward to support the swinging cover. (aids in tank access when doing cleaning or anytime you need to get inside & get dirty!!!)
 

Attachments

  • MVC-001S.JPG
    MVC-001S.JPG
    46.7 KB · Views: 1,029
Last edited:
a little overkill dont ya think:eek: im the same way when i comes to building things:D looking good:cool:
 
Ouch....I bet all that 3/4 square aluminum tubing cost some $$$.
 
Heres what the pivot point looks like...All it consists of are two peices of aluminum stock welded on the sides of the center sections of the frame. (the nail was just used to line up the holes before clamping to tig weld)
 

Attachments

  • MVC-004S.JPG
    MVC-004S.JPG
    25.2 KB · Views: 1,036
A front shot with the right support welded in place & in it's upright support position. There will be a second one added to the left of this one spaced evenly from the other end. (notice the stop to the rear of the stock)
 

Attachments

  • MVC-005S.JPG
    MVC-005S.JPG
    44.7 KB · Views: 1,038
heres a close up of the stop....just a peice of stock welded to the center top section of the frame to prevent the swinging arm from slipping to far!!
 

Attachments

  • MVC-003S.JPG
    MVC-003S.JPG
    24.7 KB · Views: 1,026
I'll continue tommorow

Thanks for looking..;)
 
seen it in person. great piece of workmanship. excellent design because he has full access to everything in the tank unlike other hoods that do restict. nice job.
 
nice work Brian...must be relatively light and rust proof!! Can't wait to see what you skinned it with
 
Now I begin to fit the rear top section & also rear back section with one peice of aluminum sheet. I sheared a peice of aluminum sheeting to size & used a sheet metal brake to acheive the 90 degree angle.
 

Attachments

  • MVC-009S.JPG
    MVC-009S.JPG
    42 KB · Views: 997
Nice! Should be great access and lightweight.

Will you finish it with something. I'd think it might oxidize and get flakey if left unfinished in a salt environment.
 
Nice! Should be great access and lightweight.

Will you finish it with something. I'd think it might oxidize and get flakey if left unfinished in a salt environment.

Yes etching primer..(zinc phosphate) than a topcoat on the inside...I will continue the pics & step by step....sorry for the delay...
 
Hey B, nice to be in the car repair business isn't it? Lots of access to equipment and stock to build lightweight aluminum hoods............and a tig welder too......I used to be in that position too when our shop was still around. Nice work by the way, and yes the finished product is amazing as well. Keep this thread going when you have time.............
 
Back
Top