• ******* To read about the changes to the marketplace click here

175 Gallon + SUMP - Raptor Island Reef Build - Reef Document

kiwi

Well-Known Member
BRS Member
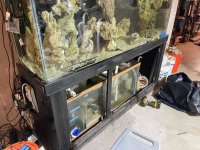
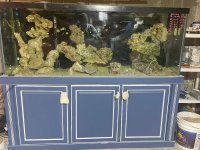
I have restarted after 4 years to redo my 175G tank and sump. Back Story (Will find photos)

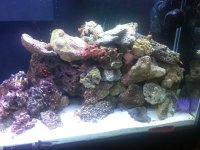
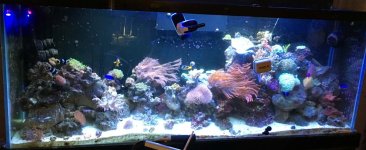
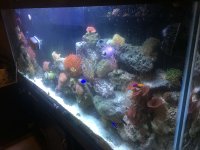
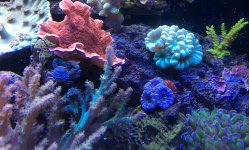
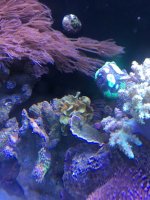
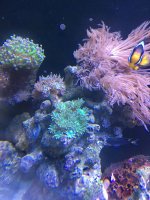
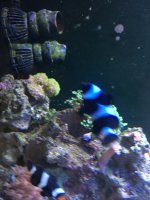
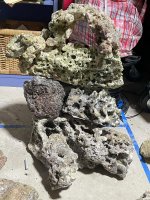
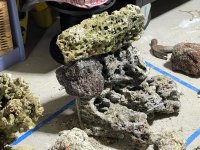
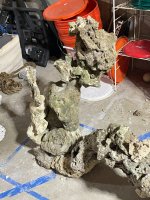
I built up what I thought was beautiful over 6-7 years with a variety of coral, fish and critters. I grew most from frags I brought from Dong, another member in Malden (cant remember right now) and Jay's aquatics for the odd piece for a present. Of course having started new my aquascape was more of a pile of rock and rubble. My sand bed was way to deep and was a little bit of a mix n match generated over time with all the errors that go along with the learning.

Any way - I ended up having to get my hips replaced and the tank was down in my basement - my son who was 10 at the time wanted to help and did some feeding and told me how things looked and enjoyed it and I enjoyed his interest. Unfortunately, the tank had lots of Coraline growing and he thought it was bad and needed cleaned off, being 10 cleaning products were what he used - end of tank and while I was so very upset, I couldn't be but couldn't bring myself to do anything, so it sat dormant for about 4 years.

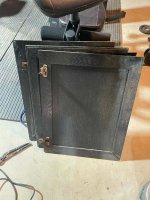
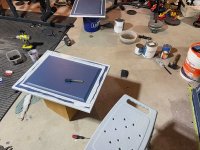
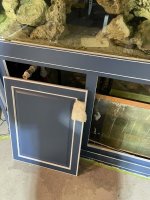
I have decided to give it another go now that the pain has subsided and actually like the excitement of all the planning and newness again and want to journal it as I go through the rebuild. I have been using Claude and DeepSeek as my advisors to see where it leads step by step with everything from Aquascape, to all the equipment placement, repairs and maintenance, shopping, cost savings and general information on each thing.

I am in cycle now and missed the Reefers Show just down the road in Topsfield but had to or would have been naughty.

If anyone is interested I will put the journal here, go back to where I decided to start up again, add prior pic's, planning pic's and as I grow it out continue to update - if no one is interested or comments no bother either as so happy to be rebuilding although it is scarry after having lost so much previously.
TotalSetup112025.jpg
Raptor_Island_Left.jpg
Arch_Left_to_Middle_Islands.jpg
Middle_Island.jpg
AqurairumSideOnLeft.jpg
 
I found some photo's of about 1-1.5 years before I lost the tank - the pile of rock, deep sand bed, bad flow - lots of things but everything was happy and grew like crazy - still makes me sad to this day as it was my zen and I hurt it. Anyway - one thing that I realize is that I did not take nearly enough photos to appreciate it.

If you are reading this and have not taken photos of your tank I highly recommend it as part of the monthly schedule and journal.
 

Attachments

  • The start.jpg
    The start.jpg
    207.8 KB · Views: 67
  • Old Tank.jpg
    Old Tank.jpg
    125.3 KB · Views: 68
  • Sideon.jpg
    Sideon.jpg
    159.9 KB · Views: 68
  • Color.jpg
    Color.jpg
    223.1 KB · Views: 67
  • bad placement.jpg
    bad placement.jpg
    130.9 KB · Views: 71
  • Gidday.jpg
    Gidday.jpg
    152.5 KB · Views: 66
  • MatedPair.jpg
    MatedPair.jpg
    108.9 KB · Views: 71
I walked past the tanks for years and had covered it over so that I couldn't see it but still didn't want to part it out. So a few weeks ago when I was redoing the basement, I thought I would have a look under the covers and that was my trigger.
And proceeded to do the following...
1: I took out all of the equipment
2: Took out all of the rock and put in large barrel
3: Dug out the sand and put it in the old salt mix buckets.

Next I went and got a couple of gallons vinegar.
Went to turn the RODI and it had a leak and some parts had been pirated so had to fix that quick and get the auto turnoff going or my wife would kill me before I started.

Got the RODI working a charm and made a batch of Saltwater I added to the rock and some to the sand.

Made a big tub of vinegar water and put all my water equipment in for a few days to soak before tests.
Gave any of the salt residue a clean off but left as much as I could in the form of bottom sand and water, old coralline on back of tank etc, gave the sump a good clean apart from the fuge where all I did was take out all of the rubble I had in there.

As I was going to do it better and more sustainable this time round I decided to let "AI" be my guide and teacher and started to put all of the information into Claude and asked for different out comes - will add document latter.

So Claude suggested that with my lights, pumps, wave makers and tank/sump on the direction I should take and how to go about it. the depths for each zone/corals which I put on a marking pipe, depth of sand, to have 3 island, where to position them, the heights of each island, the placement of the wave makers, the placement of the lights, the setup of the controllers and right down to the outflow novel placement.

After a few days I got into testing all the bits of equipment and several things had issues - skimmer, tunze, some heaters, pulled all apart and cleaned down properly - I worked through each issue using Claude and got all working fine so now had all the components to invest the time into doing this properly.

Old coral: This was hard but had to be done - I took all of my old dead corals and put them in a bucket of bleach and water to soak for a week - they have come out so white, some still have a few patches so will bush them down and do one more week of bleaching and then will look to have them in my office as a reminder of my mistake and look to use some as cabinet door handles.

Rock - I went through and sorted all of the rock into 3 types - Lava, Fiji and Porous - Claude had suggested that the largest pieces be used on the bottom against the glass and flat as possible to stop any critters undermining and causing a topple that could ruin the aquascape and more importantly break the glass in worse case. Once I got the rock all separated out, I built a mock tank on the floor with tape and cardboard. In my last build it was more of a lose rock wall design (no design just as I got stuff). Claude suggested putting it all together with rod and drilling it in. I went and got a diamond bit and 3/8 rod with a ton of gorilla glue to tie it all in.
Aqua scaping - this was fun and very artistic in nature as I took about 2 weeks in moving pieces of rock around, trying different things and making sure I met all of the criteria at each level of the markings to accommodate where the new creatures and corals were to go. I had to do lots of chiseling; the drilling was very hard and sometimes would cause a break off and would have to go back to the drawing board as placement and stability would be changed. The hardest part was when you had to join two pieces on an angle and align the two holes as you were counting on that to connect the next rock you had planned out. As it all comes together it becomes more and more exciting each night. I decided to go with a tall wide island where the top flat rock took the shape of a Raptor/Dragon, the middle island is lower for LPS and lots of flat areas, after building that I decided to join the 2 islands with an Arch Bridge to match the same height on the measuring stick and add more area. The last Island was to be all volcanic but in building it found that most volcanic is hard to work with, just monolithic blocks and didn't have enough to do it all in igneous rock any way. Changed to build a wall similar to doing a wall dive.

I was very happy with how it turned out and enjoyable. In doing design rather than a throw together, it is more stressful in terms of making it all fit together, balancing, the drilling dust and mess. It was made in a way that it can be pulled apart and put back together as needed thinking about having to undo it all and then rebuild it back in the tank which was going to be a challenge in itself.

I left it for a couple of days and observed a few areas that need some tweaks and changes rather than just chuck it all in the tank to get the cycle underway and am happy for it.

The move to the tank was harder than expected and should have taken more photos - had one piece break so had to get repairs in place in tank otherwise to disassemble and redo again could have turned into a true domino effect. Got it all done and then added the water and did a 4 day test of equipment and automation before turning off the lights and starting the cycle session.

Updated Claude and looked into what I could do while waiting for the cycle - I unfortunately started 4-6 weeks too late as the Fragestrvaganza in Topsfield is just 10 minutes from me and would have been perfect.

Next year
 

Attachments

  • Wall Island.jpg
    Wall Island.jpg
    228.9 KB · Views: 40
  • Building Wall.jpg
    Building Wall.jpg
    301.3 KB · Views: 37
  • middle platform island.jpg
    middle platform island.jpg
    230.2 KB · Views: 36
  • Raptor and arch.jpg
    Raptor and arch.jpg
    207.4 KB · Views: 38
  • measurement stick.jpg
    measurement stick.jpg
    117.9 KB · Views: 37
Would appreciate some people to look at the guide and provide some feedback!!!
REEFERS GUIDE DOCUMENT - Building, Buying Comparisons, Problems and Solutions, Templates.pdf
(SAMPLE)
Table of Contents.
1. Introduction & Guide Overview.
1.1 Why This Guide Exists.
1.2 Core Guiding Principles.
1.3 How to Use This Guide.

3.2 Three-Island Aquascape Philosophy. 1
5. Foundation Coral Order: Complete Analysis. 22
PART III Mushroom Coral Biology & Overview.. 51
Why Mushroom Corals Are Exceptional Foundation Species. 51

PART VII : RECORD KEEPING & TROUBLESHOOTING. 176
PROBLEM DIAGNOSIS FLOWCHARTS. 189
CONCLUSION.. 209
FINAL THOUGHTS. 210


As part of my Aquarium Build I decided to do it based on AI - Claude and DeepSeek.
The Guide attached is extensive- Part 1 is a condensed version of the guide with Parts - II - VII being detailed sections covering all the areas I wanted to know about the 50 Corals I investigated.

I will update based on feedback and is available to anyone who might get some use out of it - if it is seen by those with more knowledge than me to be trash then that is where it will go :)

The attached file is over 5000K so too big to post directly sorry...Please provide feedback and will update

REEFERS GUIDE DOCUMENT - Building, Buying Comparisons, Problems and Solutions, Templates.pdf
 
Last edited:
I decided to redo the cabniets and reorg while waiting for the cycle - It ended up being a bigger job than expected trying to get all of the lines just right.

Went with a Royal Blue with White inlays

For the Handles I used some of my Old Coral Skeletons - what do you think?
 

Attachments

  • 0b2e706a-4a82-425e-b828-cacae1e5f1eb.jpg
    0b2e706a-4a82-425e-b828-cacae1e5f1eb.jpg
    285.1 KB · Views: 48
  • 717bcefa-512e-47ba-9657-d1d5e764ed94.jpg
    717bcefa-512e-47ba-9657-d1d5e764ed94.jpg
    159.4 KB · Views: 48
  • 8656a95f-7353-403f-81d9-3453a8ebd082.jpg
    8656a95f-7353-403f-81d9-3453a8ebd082.jpg
    245.1 KB · Views: 50
  • e65d3e1b-985a-4a97-8bd8-b5fc06266eaa.jpg
    e65d3e1b-985a-4a97-8bd8-b5fc06266eaa.jpg
    145.5 KB · Views: 53
  • 5af0e49d-32a6-4032-b83d-62a863cd01eb.jpg
    5af0e49d-32a6-4032-b83d-62a863cd01eb.jpg
    215.5 KB · Views: 52
Current Cycle Stats: When should I order - Missed Fagaganza, Black Friday, Cyber Monday

Temp (Constant) 78.4
SG (Constant) 0.025
PH (Fluctuates) 7.8 - 8.2
ALK (Tested 2 days - added baking soda mix) - .54 mls - 7.4 -> .50 mls 8.0 dKH
NH4 (Constant 3 days) 0 ppm
NO2 (Fluctuated) 1 - .50
NO3 20 ppm
No lights
High surface agitation atm

My copepod tank is thriving with grow light over it rather than sump
 
Whoop - whoop

Finally 3 days of 0 NH4 and NO2 - I am cycled - took forever for the Nitrites to go in the fishless cycle.

If anyone is in the North Shore Area and can help me get started:

Zoa's - Leather - Kenya - Mush - Dunc - Monty


Very interested in starting small and local this time around - This part is so exciting and am looking forward to the nurture and growth - as I said in a previous post - take photos as it changes over time.

I am going to keep adding pics to this reef build and any gear changes.
 
If anyone is in the North Shore Area and can help me get started:

Zoa's - Leather - Kenya - Mush - Dunc - Monty
 
Through the brown stage and have some hair Algee starting.

So I have added the following:
CUC: Emerald, 4 Tonga, 4 Narssis, 4 Trouche
Copepods to both main and sump
Cheto to sump
Photo for feeding

Toadstool - Brown in color when I rescued it - polyps just starting to emerge and green tinge
Cabbage Coral (I think it is but cant tell as almost solid when I rescued it) - Brown with polyps on edge and some bumps starting to show - looks more like a toadstool atm
GSP on backwall - has just started to open properly - had a couple of issues getting to stick
Green Hairy Mushroom - looks like it is growing second mouth
Bright yellow Mushroom - got hurt when trapped under a rock - has gone brown atm but opening up
Gongoria - brown but fully extended and swaying and can see a little growth
Red Cabbage coral - looks like it has started a second leaf on the rock below it
Duncan Coral - 1 large head and one small head
3 days ago:
Enrusting orange rippling monitpora - 3 inch round near surface
Orange with yellow eyes montipora - started to go brown and turn pinkish so moved to lower light today
Frog Spawn Coral - 3 heads and fully extending
Candy Cane Coral with three heads fully extended

I am very worried about the monti but very new so need to let it acclimate
 
If anyone is in the North Shore Area and can help me get started:

Zoa's - Leather - Kenya - Mush - Dunc - Monty
north shore here. If you become a New paid member I will hook you up with the following frags to get you going with a few more frags.

Greg Hiller long tentacle leather
IMG_3224.jpeg

Montipora Frag about 2”

IMG_3223.jpeg

Hammer Coral single head

IMG_3226.jpeg

Mini colony of button polyps on a 1/2lb pice of live rock. (probably over 50 polyps)

IMG_3225.jpeg
 
Back
Top