I currently in the process of cycling a 29 bio cube to replace my 20 G bow front sea horse tank..
There are several problems with the 20 that occur with keeping H Kuda in that tank... aside from the fact that they have flat out grown it.. #1 is evaporation.. my home is not air conditioned and a 4" fan is used for evaporative cooling.. it is effective but at a cost... in the long term... the Sg. fluctuation is a problem... especially for my gorgonians that are the main hitching post for my ponies...
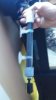
For the ATO.. I used a 8" length of SCH. 80(grey) ( sch.40 is white and fine for he project)...
I used a cap drilled 1/8" FNPT ( a female reducer 1/2 X 1/4" with a threaded 1/4 X 1/8 reducer bushing would be required).. the opposite end is a 1/2 X 1/2 MNPT adapter and a 1/2FNPT threaded cap ( which will be drilled 1/4" top facilitate the switch wires)... I used a all purpose Buna n liquid level switch (Grainger) P/N 4YM35... the wires are fairly short so I solder 2' of 16 Ga. lamp cord to the leads, sealing them with liquid tape and heat shrink.. pipe tape is applied to the threads of the level switch and the male ends of the adapter .. then the cap is screwed on and the hole sealed with silicone.... the wires are run to a relay and holder(Grainger P/N 4E15 and 6C898 respectively) in the display cabinet.... the out put wire from the relay is wired to a single outlet in a water proof box to accept the plug from the pump ...
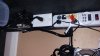
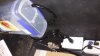
the receptacle is a container ( bought at home goods) similar to those used to store flour and sugar etc... it holds about 1 1/2 gallons of liquid is just wide enough to house a 150GPH power head ( Petco ) and still leave plenty of room for my 900 BTU chiller 9 another new addition) I block off the 1/2" return port with a rubber plug ( a length of 1/2" hose and wooden dowel would do) the "air" port ( remember this is a power head)is utilized to attach a length of air tubing that is run up to the center compartment of the tank... a short length of 316 SS wire ( can be purchased local or from McMaster Carr) is inserted in the hose and used to form the "s" hook to keep the hose above water level in the tank... the power to the relay is plugged into the power strip ( which is GFI protected).. the pump delivers just enough water to slowly add make up with put effecting the Sg in the tank.. adjustment of the float is as easy as sliding the pipe up or down in the suction cup brackets ( replacement heater brackets bought at Petco)..The tank is still cycling and I have another 15lbs of live rock ( currently in the 20G) to add along with a lot more macro algae. The new digs should make a fine stable for my ponies for years to come...
There are several problems with the 20 that occur with keeping H Kuda in that tank... aside from the fact that they have flat out grown it.. #1 is evaporation.. my home is not air conditioned and a 4" fan is used for evaporative cooling.. it is effective but at a cost... in the long term... the Sg. fluctuation is a problem... especially for my gorgonians that are the main hitching post for my ponies...
For the ATO.. I used a 8" length of SCH. 80(grey) ( sch.40 is white and fine for he project)...
I used a cap drilled 1/8" FNPT ( a female reducer 1/2 X 1/4" with a threaded 1/4 X 1/8 reducer bushing would be required).. the opposite end is a 1/2 X 1/2 MNPT adapter and a 1/2FNPT threaded cap ( which will be drilled 1/4" top facilitate the switch wires)... I used a all purpose Buna n liquid level switch (Grainger) P/N 4YM35... the wires are fairly short so I solder 2' of 16 Ga. lamp cord to the leads, sealing them with liquid tape and heat shrink.. pipe tape is applied to the threads of the level switch and the male ends of the adapter .. then the cap is screwed on and the hole sealed with silicone.... the wires are run to a relay and holder(Grainger P/N 4E15 and 6C898 respectively) in the display cabinet.... the out put wire from the relay is wired to a single outlet in a water proof box to accept the plug from the pump ...
the receptacle is a container ( bought at home goods) similar to those used to store flour and sugar etc... it holds about 1 1/2 gallons of liquid is just wide enough to house a 150GPH power head ( Petco ) and still leave plenty of room for my 900 BTU chiller 9 another new addition) I block off the 1/2" return port with a rubber plug ( a length of 1/2" hose and wooden dowel would do) the "air" port ( remember this is a power head)is utilized to attach a length of air tubing that is run up to the center compartment of the tank... a short length of 316 SS wire ( can be purchased local or from McMaster Carr) is inserted in the hose and used to form the "s" hook to keep the hose above water level in the tank... the power to the relay is plugged into the power strip ( which is GFI protected).. the pump delivers just enough water to slowly add make up with put effecting the Sg in the tank.. adjustment of the float is as easy as sliding the pipe up or down in the suction cup brackets ( replacement heater brackets bought at Petco)..The tank is still cycling and I have another 15lbs of live rock ( currently in the 20G) to add along with a lot more macro algae. The new digs should make a fine stable for my ponies for years to come...