Finally time for a real build thread. My first and current tank is an AIO so there's not much to do to get it started.
For this tank everything will start from scratch.
When I was googling for fresh water shrimp I found this website petshrimp.com. What I found was a very interesting specie of shrimp Halocaridina Rubra about the size of a sexy shrimp most popularly known as the super shrimp or Opae Ula. This particular specie is super hardy. From my research, this shrimp is native to the volcanic region of Hawaii, they will thrive in a wide range of conditions, from brackish water to full ocean salinity. Growing these shrimp will be super easy as long as you provide enough algae in the tank for them to eat. All you will need is a tank with salt water, no filtertration or flow needed. A light on for 12 hours per day to grow algae and you will be all set. Many super shrimp tanks I read in posts have never done a water change or do 1 here and there whenever they feel like it. After reading all this information, I said to myself, WOW this would be a cool tank to experiment with a few red mangroves to grow out.
For this experiment, I will start with red mangrove propagules at a salinity of 1.015 with a 12 hour light cycle to grow algae for the first couple of weeks then add the super shrimps. After adding the shrimps I will let them acclimate and grow out for several months then slowly increase the salinity to 1.026. Once I'm at full salinity I will add corals and fish to turn this into a reef tank.

I have always wanted to grow mangroves in my reef tank but I have an AIO so there is no room for it and it is not ideal to grow mangroves in a reef system. For this build I would need a shallow tank, ideally a shallow cube of about 30 gallon. I went to Tewksbury to check out N.E.M.O one day and as I was leaving I saw this cube sitting on the shelf and I had to ask about it. Turns out it was the perfect tank I've been looking for. It was a 2'x'2'x1', luckily I was able to purchase it but I couldn't have it till after FFM event because they will be using it for the event. There was one problem, I will have to drill the tank for an external overflow which I already have. While I waited for spring to take the tank outside to drill. I gathered all the needed equipment, made my templates for the holes to be drilled.
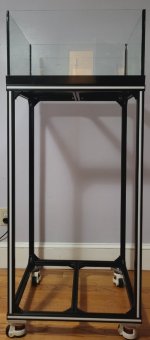
While the build was on hold, I started researching on the stand. After a few trips to home depot I started researching on extruded aluminum and decided that's what I'm going to go with. I reached out to Zeltech per @afboundguy to get a quote but had to wait till I successful drilled the tank to proceed with the stand.
Fast forward to the present!
Spring finally came today, I brought the tank outside to drill the overflow and the returns. Overflow is the Eclipse S and 2 half inch returns.

All the templates were made in the winter. Now just line them up to where I want to drill. I was going to put the overflow box in the corner with one return and leave the center open to mount the light but then decided to go with two returns so every thing will look symmetrical and figure something out for the light later.

This is what I used for lubrication. An acclimation dripper with a syringe needle attached to direct water.

At first this was a daunting task because I have never done this before. I was going to purchase a portable drill press to place the drill in to keep it nice and straight which would have prevented much of the chipping. All the prepping took the longest, drilling through the quarter inch glass only took about a minute. Even though I didnt put any pressure on the drill and let gravity did it job. I still ended up with a lot of chipping when it went through because the drill was not perfectly straight. The chipping is not a concern because it's on the outside, the gasket will be on the other side which is nice and clean. Even if the chipping is on the inside of the glass, it is only a minimum and the gasket is a half inch wide so there is still plenty of room for a water tight seal.

Test fit came out perfectly flush with the top of the glass and dead center. Now to drill the returns.

As you can see in the image, the return on the right is slightly lower then the one on the left. When I started the drill it jerked my template and moved it slightly.

Filled the tank to see where the water level will be on the returns. From the looks of it, once I have all the plumbing in place the water level will be slightly higher, the two return bulkheads will be completely submerged so I wont notice their height difference. I'm not completely happy with how the 2 returns turned out because I could have placed them a bit higher for my liking. On the other hand I was going with the 1 1/2 times rule when drilling glass just to be safe since its my first time doing it.
For those that have never drill a tank before, it is a fairly straight forward and easy job. All the work is in the prep for drilling.
Now onto picking a background for the tank while I wait for Zeltech to get back to me with the new quote because I made changes to some of the dimensions.
I'm not going to go with black but thinking of a light blue. Something different that will make the inhabitants of the tank stand out more. I'm open to ideas!
For this tank everything will start from scratch.
When I was googling for fresh water shrimp I found this website petshrimp.com. What I found was a very interesting specie of shrimp Halocaridina Rubra about the size of a sexy shrimp most popularly known as the super shrimp or Opae Ula. This particular specie is super hardy. From my research, this shrimp is native to the volcanic region of Hawaii, they will thrive in a wide range of conditions, from brackish water to full ocean salinity. Growing these shrimp will be super easy as long as you provide enough algae in the tank for them to eat. All you will need is a tank with salt water, no filtertration or flow needed. A light on for 12 hours per day to grow algae and you will be all set. Many super shrimp tanks I read in posts have never done a water change or do 1 here and there whenever they feel like it. After reading all this information, I said to myself, WOW this would be a cool tank to experiment with a few red mangroves to grow out.
For this experiment, I will start with red mangrove propagules at a salinity of 1.015 with a 12 hour light cycle to grow algae for the first couple of weeks then add the super shrimps. After adding the shrimps I will let them acclimate and grow out for several months then slowly increase the salinity to 1.026. Once I'm at full salinity I will add corals and fish to turn this into a reef tank.
I have always wanted to grow mangroves in my reef tank but I have an AIO so there is no room for it and it is not ideal to grow mangroves in a reef system. For this build I would need a shallow tank, ideally a shallow cube of about 30 gallon. I went to Tewksbury to check out N.E.M.O one day and as I was leaving I saw this cube sitting on the shelf and I had to ask about it. Turns out it was the perfect tank I've been looking for. It was a 2'x'2'x1', luckily I was able to purchase it but I couldn't have it till after FFM event because they will be using it for the event. There was one problem, I will have to drill the tank for an external overflow which I already have. While I waited for spring to take the tank outside to drill. I gathered all the needed equipment, made my templates for the holes to be drilled.
While the build was on hold, I started researching on the stand. After a few trips to home depot I started researching on extruded aluminum and decided that's what I'm going to go with. I reached out to Zeltech per @afboundguy to get a quote but had to wait till I successful drilled the tank to proceed with the stand.
Fast forward to the present!
Spring finally came today, I brought the tank outside to drill the overflow and the returns. Overflow is the Eclipse S and 2 half inch returns.
All the templates were made in the winter. Now just line them up to where I want to drill. I was going to put the overflow box in the corner with one return and leave the center open to mount the light but then decided to go with two returns so every thing will look symmetrical and figure something out for the light later.
This is what I used for lubrication. An acclimation dripper with a syringe needle attached to direct water.
At first this was a daunting task because I have never done this before. I was going to purchase a portable drill press to place the drill in to keep it nice and straight which would have prevented much of the chipping. All the prepping took the longest, drilling through the quarter inch glass only took about a minute. Even though I didnt put any pressure on the drill and let gravity did it job. I still ended up with a lot of chipping when it went through because the drill was not perfectly straight. The chipping is not a concern because it's on the outside, the gasket will be on the other side which is nice and clean. Even if the chipping is on the inside of the glass, it is only a minimum and the gasket is a half inch wide so there is still plenty of room for a water tight seal.
Test fit came out perfectly flush with the top of the glass and dead center. Now to drill the returns.
As you can see in the image, the return on the right is slightly lower then the one on the left. When I started the drill it jerked my template and moved it slightly.
Filled the tank to see where the water level will be on the returns. From the looks of it, once I have all the plumbing in place the water level will be slightly higher, the two return bulkheads will be completely submerged so I wont notice their height difference. I'm not completely happy with how the 2 returns turned out because I could have placed them a bit higher for my liking. On the other hand I was going with the 1 1/2 times rule when drilling glass just to be safe since its my first time doing it.
For those that have never drill a tank before, it is a fairly straight forward and easy job. All the work is in the prep for drilling.
Now onto picking a background for the tank while I wait for Zeltech to get back to me with the new quote because I made changes to some of the dimensions.
I'm not going to go with black but thinking of a light blue. Something different that will make the inhabitants of the tank stand out more. I'm open to ideas!
Last edited: