• ******* To read about the changes to the marketplace click here

STiTCH87's 40g Breeder Starfire Build

I couldn't resist, i'm going to go back today and hopefully put on the second coat of stain. I'll take a bunch of photos when I do. This time with a real digital camera. Lol.
 
Welp, Minwax black poly-shades wood stain is complete S**T for future reference to anyone who'd consider using it. Don't. First coat came out decent, but did leave a few dark speckles here and there and it was FAR from black. Second coat applied a day later, didn't make it ANY darker. In fact, it seemed to have removed part of the first layer. I rubbed off excess real good and everything, and it just doesn't work on raw oak. I used the pre-stain stuff and everything. That stain dries so quick that it was like wiping off tar within 2 minutes of it being applied.

All in all a horrible experience and a waste of $20 worth of supplies.

SO... Plan B...

I'm gonna use primer and paint the bastard black. Should've done that in the first place. IDK how to paint/prime over wood stain, and i'm not willing to sand the wood. I'm pissed and just want it all done. Sooo i'm going to Home Depot in a few to get help and opinions. Hopefully someone knowledgeable will be working tonight. Wish I could return the stain and pre-stain and get a refund, but I doubt it. Plus I don't think I have the receipt...
 
Did some more work on it tonight, and as promised, I took pictures. I forgot my camera though so you guys will have to enjoy my cellphone quality crap once again. Lol.

IMAG0024.jpg
This is the port I drilled in the back for the return and ventilation. Came out very nice IMO.

IMAG0025.jpg
Then today I lost the hole saw somewhere and had to make the other one a big rectangle, but oh well. More ventilation and nobody will see it anyways.

IMAG0026.jpg
This is the wood "stained" to what was labeled on the can as "black". If you can believe it, that's three coats, 8 hours apart. 2nd and third coat didn't even darken from the first. Garbage.

IMAG0027.jpg
Then I said screw the stain and I bought two cans of Kryolan Fusion Gloss Black. Let me tell you, it works BEAUTIFUL!!!

IMAG0030.jpg
 
Last edited:
looks good, wood will only soak in enough stain from 1-2 coats. most of the time depending on how long you leave the stain set for the first coat it might be enough
if you want full coverage paint is the only way to roll.
 
Yeah they said you usually only need two coats, and i'm sitting here staring at the wood like "Erm, this isn't even grey nevermind black" lol.

IDK if it just needed to be better mixed or was a bad batch or if the wood was just super dense or what happened.

But never the less, that Kryolan Fusion Gloss Black in a spray can gave me the most even, shiniest coverage ever. This thing looks super professional now.

Wish I had my real camera with me to do a HQ macro shot to show just how well it came out.

$20 worth of pre-stain and stain and brush = FAIL

$9 worth of Kryloan spray paint = EPIC WIN

Did I mention it dries within 15 minutes of application and can be handled after 2 hours? And that it only required one coat? Yeah, awesomeness!

I'm going back there today to bring it into the basement through the bulkhead and put the tank back onto it and put it into it's permanent location in the room.

I sprayed an old record player component shelf black as well to match and that's where i'll be keeping all my electronics and supplies so that they aren't in a moist humid stand.

Has a glass door front and everything. Also looks very clean and professional. This build is becoming very clean and classy IMHO and I couldn't be happier.
 
IMAG0034.jpg
You can see the stand i'll be using to the right of the tank to store all the electronics and power boxes and supplies.
I know it looks crooked, but it's just the angle of the photo. I can assure you it's 100% level and solid. Lol.

IMAG0035.jpg

IMAG0036.jpg
You can really see how smooth the coverage is and how much of a shine the gloss gives off while still retaining the wood grain texture.
 
Nice build... I like the stand for your electronics, great idea. I might do something similar for my ATO water storage just smaller. Keep the pics coming!
 
Yeah I had heard and seen first hand of quite a few power surge boxes and wires and cables in general starting to corrode from salt moisture and the thought of corroded electronics in a 100% wooden stand just didn't make me feel at ease.
So I bought that old record player stand for $7.50 (it's was 50% off because I waited until it was grey tag day so everything with that color tag would be half price ;) ) normally $15 at Savers and painted it black including the back side of the glass door with a 98cent can of spray paint from Wal*Mart.

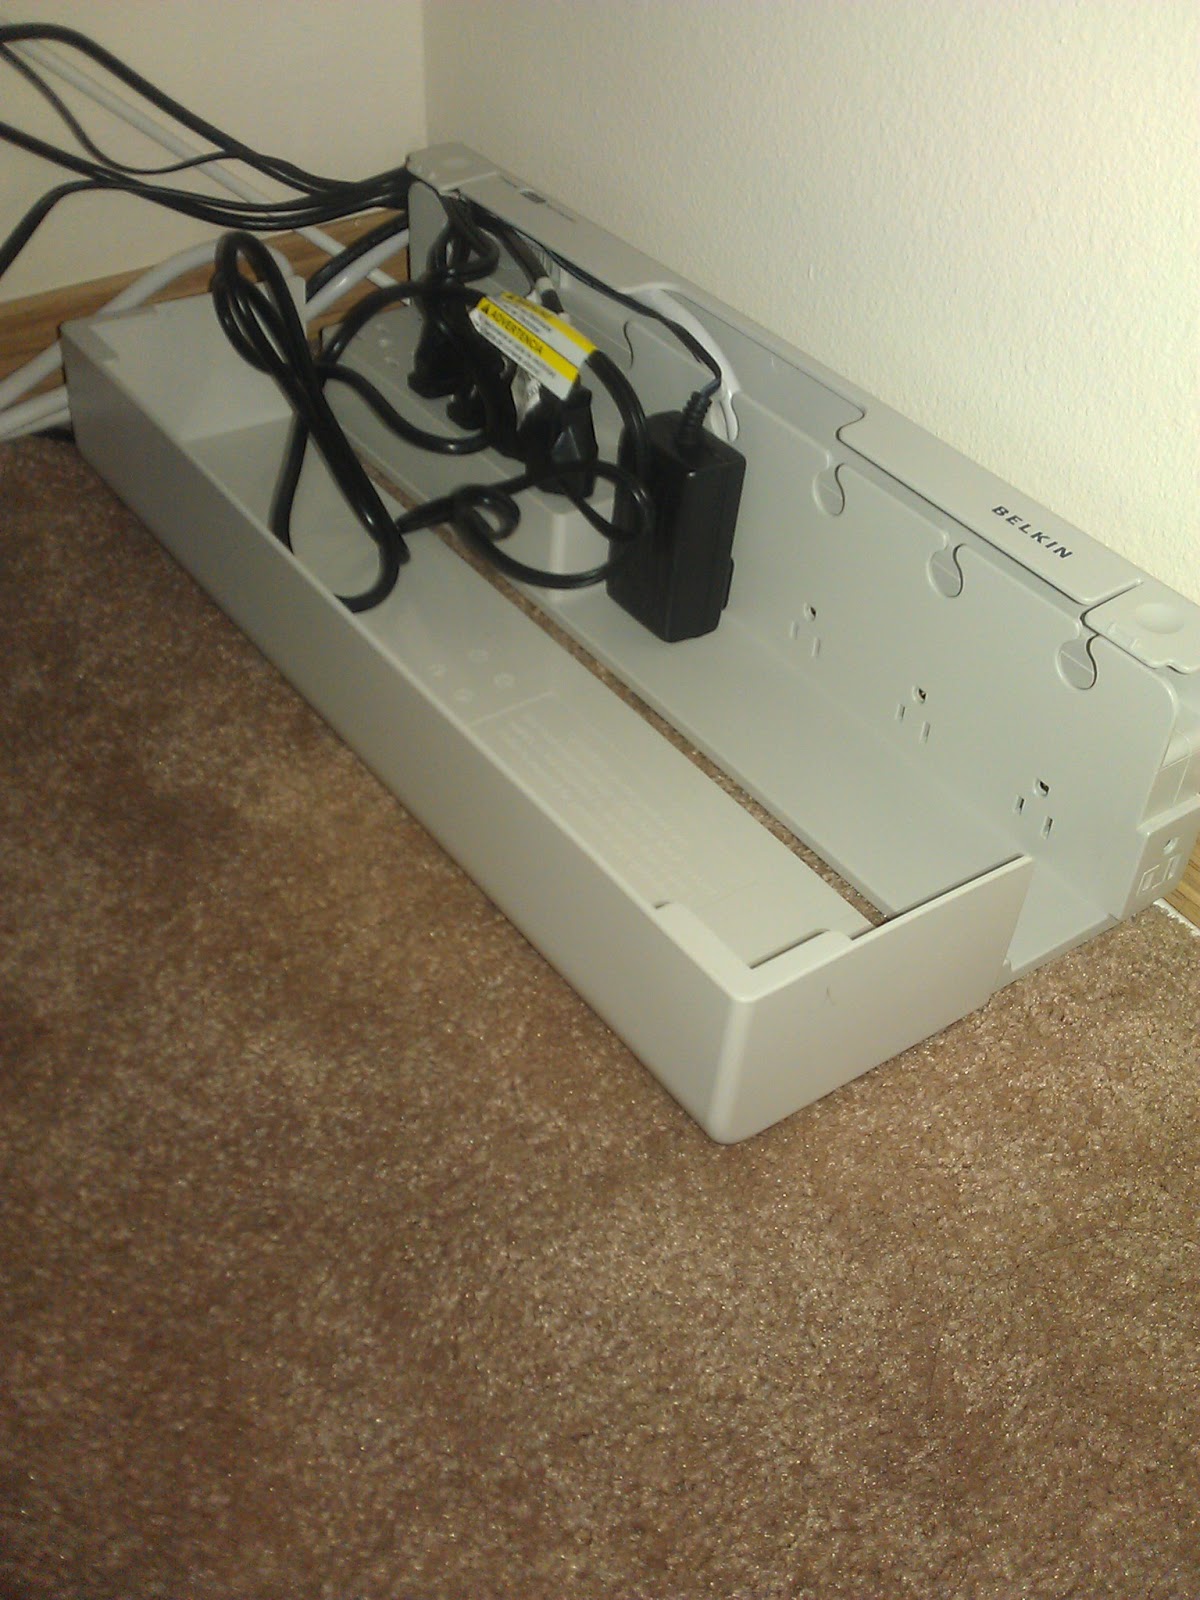
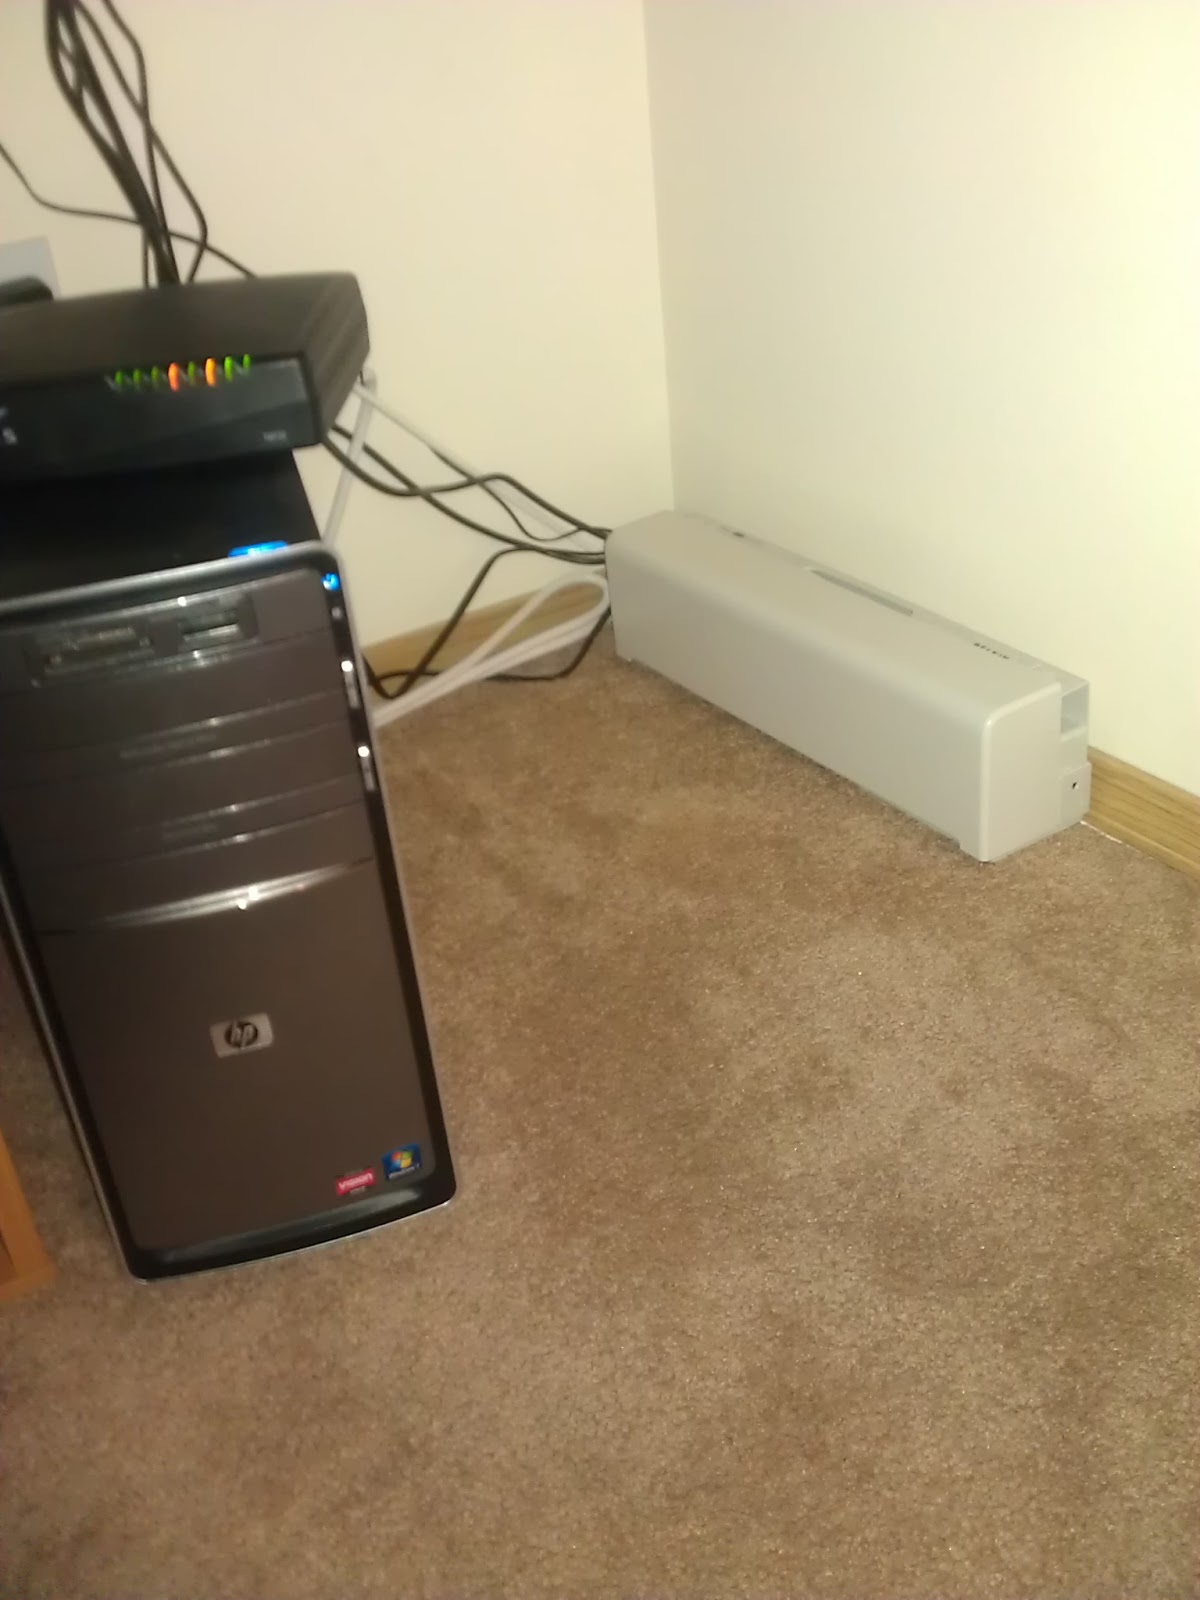
Inside the stand to keep things even more neat, I got this:
IMAG0826.jpg

IMAG0824.jpg


Note that's not mine, but it explains what it does. Awesome idea. SOOO clean looking. I love how minimalist and organized this build is and how clean.

I'm actually far more satisfied with the build than my original hopes and am loving every second of it.

OH!!!

I almost forgot!!!

I ordered the fiji pink sand yesterday along with my light which NOBODY on here has yet!
I think you'll all be very excited over this light, and I am going to be doing a detailed review on it as there is zero input online about it from owners since it was just released to the public two weeks ago.

Maxspect-Razor-LED-Layout.jpg

I got that same 27" 16,000k unit.
They are ALL currently on Pre-Order on most sites regardless of length or color, but Marine Depot does have a few more 27" 16,000k ones in stock for under $500.
It will be here Monday afternoon, and you can bet your banana i'm going to open the box a.s.a.p. and take a few million photos and videos.

I feel comfortable saying you most likely won't find anyone else in New England with one over their aquarium. If so, there's likely only half a dozen of us so far.

More info on the Maxspect R420R Razor:
http://www.thesaltybox.com/forum/equipment-reviews/123686-maxspect-razor-1st-impressions.html
 
Last edited:
Your link after I got this is missing: :(

And that light is slick, are you going to use the legs or hang it? Man it is thin
 
What link is missing?

It's equally thin as a sharpie marker. And I will be using the legs at first, but ultimately it will be hung. Thing weighs virtually nothing.

I made the sump tonight!

Don't judge my silicone job, and yes, I know it is a HUGE refugium. Lmfao. I built it from left to right, measuring everything to make sure I had the smallest sections possible but big enough to still fit the skimmer and return pump in their sections, thinking it'd make the refugium around the same size as the other chambers. Then once I put in the first 3 baffles, I realized I was imagining the tank was 20" and not the actual 30" hahaha so now I have a 12"x12" refugium in my sump. WHOOPS!!!

More surface area for a DSB and macroalgae I suppose...

Did I build it all right? Or did I mess up badly?

IMAG0037.jpgIMAG0038.jpg
 
Looks great so far! The pink walls really complement the stand. =)
 
I get so much ******** for the pink walls. Lmfao. Even Greg at Underwater World poked fun at me about them.
But it's my fiance's bedroom in the basement that we are turning into our apartment and it would've taken so much work to move out all the furniture and everything to paint all the walls that it didn't seem worth it.

I'm still happy though. The fiance loves her pink walls, and I love my reef tank. So it's a win win. A happy wife is a happy life. Lol.

Good news is that some day, if need be, there is still enough room behind the tank to reach in and paint the walls if I do ever decide to do so.

I know you're all just kidding though lol so no worries I don't take humor the wrong way. =]
 
That light looks slick man. I love my halide but miss the control ability of th Ai's I had. I can't ait to see how the color looks I wasn't super fond of the AI spectrum.
 
Sorry the pics didn't load the first few times I viewed them of your cord manager thing, but I see now
 
UPDATES!!!

The packing peanuts I ordered finally arrived!!! This is a testament to the intense quality service with which Marine Depot ships their items.
DSC07812.JPG

I even got a sweet shirt for FREE!!!
DSC07813.JPG

Take a focus on the hanging kit. That's the same kit you see at most LFS for $45. INCLUDED with the light! Dry wall ceiling anchors and everything.
DSC07815.JPG

A little example of the light.
DSC07816.JPG

Lights out, LEDs on.
DSC07817.JPG
 
You can somewhat see light spread and how thin the light is here.
DSC07821.JPG

Lights dim to see the layout.
DSC07822.JPG

Close up of LED layout. Three types of blue. Two types of White. And a pair of Epileds Dual Core UV. 13 bulbs per cluster for a total of 39 LEDs. 33 of which are top of the line Cree XT-E and XP-E Series LEDs.

DSC07823.JPG

The unit is literally barely thicker than a Sharpie at it's thickest point.
DSC07824.JPG


Specs:
http://coralvue.com/r420r-specifications/
 
Last edited:
Back
Top