Jim Tansey---Build

Jim Tansey

Well-Known Member
BRS Member
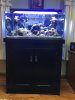
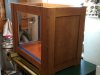
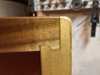
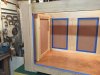
The system I have now in my living room was intended for my basement and by no means "furniture grade" the tank is 18" high x 24" deep x 36" long I purchased it from a member in Boston about three years ago, as I was about to set it up in the basement with my newly built rather crude stand my wife wanted it upstairs so.....a paint job and doors and up it went. I have never been happy with stand or tank since day one, the tank has some bad scratches on the front glass and the stand I built to be functional only. One interesting aspect of the tank is it was built as I was told by an X-BRS president, for you old timers I know "Dave McReeferson" built a tank but that was much larger anyone know who might have built it? They did a very nice job on it but someone added a poorly built overflow and scratches to it. I don't have my new tank yet and it will be sometime before I get it, I do have one quote and know the size required to fit the space 18" high x 24" deep x 42" long about 70+ gal. The first part of the build thread is the stand just for a little background I've been woodworking for a lot of years and collected a lot of tools along the way I fully understand not many members will have the same resources but I hope you find it entertaining following along. I will build on the thread as the project moves along.

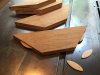
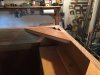
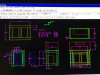
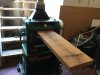
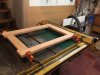
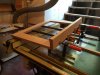
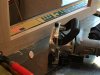
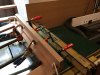
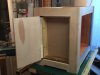
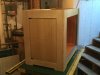
First step get my old, old Auto Cad program out (Release 11 I think), a couple of features I wanted was a space for mounting equipment that was easy to access and not buried deep under the cabinet and a nice finished furniture grade cabinet. Just a couple of pictures to get started I realize the drawing will not be clear but more details will follow. The wood in my truck is for the stand... quarter sawn white Oak....Nice Stuff.
 

Attachments

  • Cad-Web.jpg
    Cad-Web.jpg
    140.1 KB · Views: 665
  • Truck-Oak.jpg
    Truck-Oak.jpg
    149.3 KB · Views: 652
Thought I would post a picture of the reef being replaced.
 

Attachments

  • Tank-Post.jpg
    Tank-Post.jpg
    140 KB · Views: 616
Subscribed Good luck and if you need any help im right down the road.

Sent from my SM-G920P using Tapatalk
 
Just a few words about hardwoods such as the White Oak I'm using for this project, while some hardwoods can be purchased at your local lumber yard or big box store you will be limited to a narrow selection of both type and size with 3/4" thick usually all that's available. This means a trip to a hardwood dealer. One thing you will see right away as the lumber is all rough cut, not nice and smooth like you may be used to seeing. This means the boards you will be purchasing will require milling to get to a usable state. They can usually do it for you ($$$$); or, they can suggest a source. I mill my own but it requires a heavy planer and a good table saw.

If you want to talk like a pro at the hardwood dealer the lumber is purchased by the "Board Foot". ) One board foot is one inch thick by one foot wide by one foot long, or an equivalent volume, such as two inches thick by six inches wide by one foot long. The other point is the thickness is always stated in "quarters", a one inch thick board being "four quarters thick" (4 times 1/4 inch thick). The word is this started way back when the saw mills had a lever that clicked and indexed in 1/4" increments. thus the boss would call for a thickness of five clicks(or five quarters) for a 1 1/4" thick board for example.

For this project I have both five and six quarter thick stock. 1/4 inch is required to plane down to finish size so the five quarter will finish to one inch and the six quarter to 1 1/4 inches. The oak that I am using "quarter sawn." This means it is cut so that the growth rings are at or near 90 degrees to the face of the board. With white oak this gives a beautiful ray type of look to the boards. Quarter sawn also produces a nice tight grain stable board. The yield from tree is not as high with quarter sawn so the material is more costly. I included a picture of our kitchen cabinets I did a couple of years ago to show the "ray" effect. Quarter sawn white oak is commonly used in mission style furniture.

Now on to the project!
 

Attachments

  • Kitch-Post.jpg
    Kitch-Post.jpg
    141.2 KB · Views: 599
That reef tank is beautiful as it is. I can imagine the new result will be awesome.
 
Thanks nice to have a few people aboard, even got a Cape Codder.

Getting started we need to mill the stock to the required thickness and width working off a "cut list" I do on the plans. As I said before some places will mill at a cost or point you to a source that will. Often I will mill up only the stock required to get me through the next step, its not as efficient this way but milling stock produces a lot sawdust and the cleanup is easier a step at a time. The first picture is a "Thickness Planer" and as the word implies it dresses the stock thickness to the desired thickness. Second picture is my table or cabinet saw both are good heavy duty machines which makes it nice when working hardwoods
 

Attachments

  • Thk-Post.jpg
    Thk-Post.jpg
    133.1 KB · Views: 556
  • Saw-Rough.jpg
    Saw-Rough.jpg
    131.7 KB · Views: 555
So cool! Can't wait to see the next steps. (And I'm jealous! I can only do basic cabinetry)


Sent from my iPhone using Tapatalk
 
Well I can tell you I have made a lot more progress on the woodworking side than on this post, I'll try to get caught up a bit. The stock is all milled, cut to size and ready for assembly. I started with the left side which you will see that unlike the right does not have a captive Oak panel in it, the reason for this is the panel will be hinged and open to an equipment bay about two feet high 14 inches wide and 5 inches deep, this is going to be real handy for mounting various controls. The second picture shows the construction of the corner post that consists of Oak 1 1/4 x 5 & Oak 1 x 4 along with a 1 x 2 Oak support. I often see stands that are very overbuilt as far as stock sizes go using 4x4's and the like, it is far more important to use good joining practice the wood will hold up its the joints that need the attention. In this construction I used both biscuits and 3/8th dowel pins (4 pins to a joint) I don't use dowels that much but its a great joint and can be readily made with a simple dowel jig shown. Next the left and right sides are joined with horizontal 1x5 Oak rails, the back and floor are then added.
 

Attachments

  • End-Panel.jpg
    End-Panel.jpg
    133.8 KB · Views: 516
  • Corner-Post.jpg
    Corner-Post.jpg
    132.7 KB · Views: 506
  • Dowel-Jig.jpg
    Dowel-Jig.jpg
    70.5 KB · Views: 503
  • Biscuit.jpg
    Biscuit.jpg
    61.3 KB · Views: 504
  • In-Pc.jpg
    In-Pc.jpg
    67.1 KB · Views: 521
  • Case&Bot.jpg
    Case&Bot.jpg
    138 KB · Views: 527
  • Case.jpg
    Case.jpg
    136 KB · Views: 507
Last edited:
In this post I want to show the equipment bay located on the left side of the stand it consists of a frame and simple hardboard panel held in by screws and captive nuts. The panel serves as a surface to mount various pieces of equipment and is easily removed and replaced as needs and new controls are added. The bay itself is also easily removable from outside the stand and held in place by screws and captive nuts, this is important as with the sump in place it can only be removed from outside. Should the sump need to be removed it can be done from the front or side (29 gal) by removing the bay and side panel. I don't want to make much of a simple box but for those interested the joints are made drawer lock bit on the router table I tend to use this bit often its handy for a lot of things. The side panel is hinged using a glass door pivot hinge like seen on stereo cabinets, by just removing two screws the panel is removed and no hinge hardware is left behind as the bay is a snug fit to the frame.
 

Attachments

  • Equip-Box.jpg
    Equip-Box.jpg
    129.7 KB · Views: 504
  • Equip-Back.jpg
    Equip-Back.jpg
    145.9 KB · Views: 507
  • Drw-Joint.jpg
    Drw-Joint.jpg
    43.1 KB · Views: 490
  • Drw-Bit.jpg
    Drw-Bit.jpg
    47.3 KB · Views: 489
  • box-in.jpg
    box-in.jpg
    44.7 KB · Views: 501
  • box-ins.jpg
    box-ins.jpg
    70.2 KB · Views: 492
  • box-op.jpg
    box-op.jpg
    106.5 KB · Views: 484
  • box-cl.jpg
    box-cl.jpg
    114.1 KB · Views: 499
  • inside.jpg
    inside.jpg
    122 KB · Views: 482
Looking amazing.

I usually try to add some helpful comment or question when I see a good DIY thread so I can share my experience and hopefully contribute something to the project. So, umm, yea, um...... umm, umm.... OK I've got nothing :)
 
One more item before moving on to the doors is the addition of four corner braces to the stand while they look simple enough they perform a vital function and its not holding the corners together. The failure mode for this type of a structure with a very ridged base and just four vertical corner posts supporting the load is that the top portion will tend will tend to rotate or corkscrew under a heavy load placing high stresses on the joints that could lead to failure. The corner braces are very effective at preventing this corkscrew motion. A common construction method I've seen here is to build frame and "skin" it with plywood, this is also very effective for diagonal support but with the construction method I employed for this stand they are a must.
 

Attachments

  • Braces.jpg
    Braces.jpg
    85.1 KB · Views: 496
  • Brace-in.jpg
    Brace-in.jpg
    77.8 KB · Views: 494
Back
Top